AppWidgetでListView
検証したのいつかは覚えてないんですが、ネタとして書いておく
Android API Level 11(Android3.x)くらいから(RemoteViews.setRemoteAdapter辺りがAPI Level14が必要なのでAndroid4.0以降)だと思うんですが、AppWidgetにListViewが使えるようになってる。それを検証したという件
要件
AppWidgetで自分のTwitterのTLの10件を取得してそれをListViewとして表示する。OAuth使いません、まだ普通にリクエストしても取得できる模様なので(正確にはTwitter API 1.1を使う場合には認証が必須かと)
あとAndroid4.2(Emulator)で検証
AndroidManifest.xml
<?xml version="1.0" encoding="utf-8"?>
<manifest
    xmlns:android="http://schemas.android.com/apk/res/android"
    package="net.kinjouj.test.android_appwidget_listview_demo"
    android:versionCode="1"
    android:versionName="1.0" >

    <uses-sdk android:targetSdkVersion="17" android:minSdkVersion="14" android:maxSdkVersion="17" />

    <uses-permission android:name="android.permission.INTERNET" />

    <application
        android:icon="@drawable/ic_launcher"
        android:label="@string/app_name"
        android:allowBackup="false">

        <receiver android:name=".SampleWidgetProvider">
            <intent-filter>
                <action android:name="android.appwidget.action.APPWIDGET_UPDATE" />
                <!-- クリックした際のアクションを設定しておく -->
                <action android:name="net.kinjouj.test.android_appwidget_listview_demo.ACTION_CLICK" />
            </intent-filter>
            <meta-data android:name="android.appwidget.provider" android:resource="@xml/widget" />
        </receiver>

        <service
            android:name=".SampleWidgetService"
            android:permission="android.permission.BIND_REMOTEVIEWS" />

    </application>

</manifest>
API Level 11以上なんですが、RemoteViews.setRemoteAdapterのメソッドがAPI Level 14以上じゃないといけないのでminSdkVersionは14で良いんじゃないかと
んでAppWidgetの定義ファイルを作る
res/xml/widget.xml
<?xml version="1.0" ?>
<appwidget-provider
    xmlns:android="http://schemas.android.com/apk/res/android"
    android:minWidth="294dp"
    android:minHeight="294dp"
    android:initialLayout="@layout/widget_layout" />
確かAppWidgetのWidth/Heightの計算式が「74 * セル数 - 2」なので、今回4面を使うので「74 * 4 - 2 = 294」になるような感じかと
でinitialLayoutで指定されているレイアウト定義を使うのでそれを作る
res/layout/widget_layout.xml
<?xml version="1.0" ?>
<RelativeLayout
    xmlns:android="http://schemas.android.com/apk/res/android"
    android:layout_width="fill_parent"
    android:layout_height="fill_parent">

    <LinearLayout
        android:layout_width="fill_parent"
        android:layout_height="wrap_content"
        android:layout_margin="5dp">

        <Button
            android:id="@+id/btn"
            android:layout_width="fill_parent"
            android:layout_height="wrap_content"
            android:text="@string/reload_btn_label" />

    </LinearLayout>

    <LinearLayout
        android:layout_width="fill_parent"
        android:layout_height="match_parent"
        android:layout_marginTop="50dp">

        <ListView
            android:id="@+id/listView"
            android:layout_width="fill_parent"
            android:layout_height="match_parent"
            android:layout_margin="10dp" />

    </LinearLayout>

</RelativeLayout>
reload_btn_labelは適当にres/values/strings.xmlに設定しとく。まぁただのレイアウトなんだが、ListViewを使ってるっていう所。でListViewを使うのにデータをレンダリングする際に使うレイアウトファイルも必要なのでそれも作る
res/layout/widget_listview_row.xml
<?xml version="1.0" encoding="utf-8"?>
<LinearLayout
    xmlns:android="http://schemas.android.com/apk/res/android"
    android:layout_width="fill_parent"
    android:layout_height="fill_parent">

    <ImageView
        android:id="@+id/profile_image"
        android:layout_width="wrap_content"
        android:layout_height="wrap_content"
        android:layout_gravity="center_vertical" />

    <TextView
        android:id="@+id/text1"
        android:layout_width="match_parent"
        android:layout_height="wrap_content"
        android:layout_alignLeft="@+id/profile_image"
        android:padding="10dp" />

</LinearLayout>
プロフィール画像とツイートだけを表示するだけ
でここからAppWidgetのプログラミングを書く
SampleWidgetProvider.java
package net.kinjouj.test.android_appwidget_listview_demo;

import android.app.PendingIntent;
import android.appwidget.AppWidgetManager;
import android.appwidget.AppWidgetProvider;
import android.content.Context;
import android.content.Intent;
import android.net.Uri;
import android.widget.RemoteViews;

public class SampleWidgetProvider extends AppWidgetProvider {

    private static final String ACTION_CLICK = "net.kinjouj.test.android_appwidget_listview_demo.ACTION_CLICK";
    private static final String ACTION_ITEM_CLICK = "net.kinjouj.test.android_appwidget_listview_demo.ACTION_ITEM_CLICK";

    @Override
    public void onUpdate(Context ctx, AppWidgetManager manager, int[] appWidgetIds) {
        super.onUpdate(ctx, manager, appWidgetIds);

        for(int appWidgetId : appWidgetIds) {
            Intent remoteViewsFactoryIntent = new Intent(ctx, SampleWidgetService.class);
            RemoteViews rv = new RemoteViews(ctx.getPackageName(), R.layout.widget_layout);
            rv.setRemoteAdapter(R.id.listView, remoteViewsFactoryIntent);


            setOnItemSelectedPendingIntent(ctx, rv);
            setOnButtonClickPendingIntent(ctx, rv, appWidgetId);

            manager.updateAppWidget(appWidgetId, rv);
        }
    }

    @Override
    public void onReceive(Context ctx, Intent intent) {
        super.onReceive(ctx, intent);

        if(ACTION_CLICK.equals(intent.getAction())) {
            int appWidgetId = intent.getIntExtra(AppWidgetManager.EXTRA_APPWIDGET_ID, AppWidgetManager.INVALID_APPWIDGET_ID);

            if(appWidgetId != 0) {
                AppWidgetManager.getInstance(ctx).notifyAppWidgetViewDataChanged(appWidgetId, R.id.listView);
            }
        } else if(ACTION_ITEM_CLICK.equals(intent.getAction())) {
            Uri uri = intent.getData();

            if(uri != null) {
                Intent browserIntent = new Intent(Intent.ACTION_VIEW, uri);
                browserIntent.addFlags(Intent.FLAG_ACTIVITY_NEW_TASK);

                ctx.startActivity(browserIntent);
            }
        }
    }

    private void setOnItemSelectedPendingIntent(Context ctx, RemoteViews rv) {
        Intent itemClickIntent = new Intent(ctx, SampleWidgetProvider.class);
        itemClickIntent.setAction(ACTION_ITEM_CLICK);

        PendingIntent itemClickPendingIntent = PendingIntent.getBroadcast(
            ctx,
            0,
            itemClickIntent,
            PendingIntent.FLAG_UPDATE_CURRENT
        );

        rv.setPendingIntentTemplate(R.id.listView, itemClickPendingIntent);
    }

    private void setOnButtonClickPendingIntent(Context ctx, RemoteViews rv, int appWidgetId) {
        Intent btnClickIntent = new Intent(ACTION_CLICK);
        btnClickIntent.putExtra(AppWidgetManager.EXTRA_APPWIDGET_ID, appWidgetId);

        PendingIntent btnClickPendingIntent = PendingIntent.getBroadcast(
            ctx,
            0,
            btnClickIntent,
            PendingIntent.FLAG_UPDATE_CURRENT
        );

        rv.setOnClickPendingIntent(R.id.btn, btnClickPendingIntent);
    }
}
まぁ定期更新処理はしてません。ボタンを押してリロードする感じ。そこまでは今回の要件じゃないので
まぁやりたいならAlarmManagerとか使ってやる方で良いかと
でRemoteViews自体の画面処理自体はSampleWidgetServiceに要求している?ので作る
SampleWidgetService.java
package net.kinjouj.test.android_appwidget_listview_demo;

import java.io.IOException;

import android.content.Intent;
import android.graphics.Bitmap;
import android.graphics.BitmapFactory;
import android.net.Uri;
import android.util.Log;
import android.widget.RemoteViews;
import android.widget.RemoteViewsService;

import org.apache.http.HttpResponse;
import org.apache.http.client.ClientProtocolException;
import org.apache.http.client.HttpClient;
import org.apache.http.client.methods.HttpGet;
import org.apache.http.impl.client.DefaultHttpClient;
import org.apache.http.util.EntityUtils;

import org.json.JSONArray;
import org.json.JSONException;
import org.json.JSONObject;

public class SampleWidgetService extends RemoteViewsService {

    @Override
    public RemoteViewsFactory onGetViewFactory(Intent intent) {
        return new SampleWidgetFactory();
    }

    private class SampleWidgetFactory implements RemoteViewsFactory {

        private static final String TAG = "SampleViewFactory";

        private JSONArray jsons = new JSONArray();
        private Bitmap profileImage = null;

        public void onCreate() {
            Log.v(TAG, "[onCreate]");
        }

        public void onDataSetChanged() {
            Log.v(TAG, "[onDataSetChanged]");

            fetchTimelines();
        }

        public void onDestroy() {
            Log.v(TAG, "[onDestroy]");
        }

        public RemoteViews getViewAt(int position) {
            Log.v(TAG, "[getViewAt]: " + position);

            if(jsons.length() <= 0) {
                return null;
            }

            RemoteViews rv = null;

            try {
                JSONObject json = jsons.getJSONObject(position);

                if(json != null) {
                    JSONObject user = json.getJSONObject("user");

                    rv = new RemoteViews(getPackageName(), R.layout.widget_listview_row);
                    rv.setTextViewText(R.id.text1, json.getString("text"));
                    rv.setImageViewBitmap(R.id.profile_image, fetchProfileImage(user.getString("profile_image_url")));

                    Intent intent = new Intent();
                    intent.setData(
                        Uri.parse("http://twitter.com/kinjou_j/status/" + json.getString("id_str"))
                    );

                    rv.setOnClickFillInIntent(R.id.text1, intent);
                }
            } catch(JSONException e) {
                e.printStackTrace();
            }

            return rv;
        }

        public long getItemId(int position) {
            Log.v(TAG, "[getItemId]: " + position);

            return position;
        }

        public int getCount() {
            Log.v(TAG, "[getCount]");

            return jsons.length();
        }

        public RemoteViews getLoadingView() {
            Log.v(TAG, "[getLoadingView]");

            return null;
        }


        public int getViewTypeCount() {
            Log.v(TAG, "[getViewTypeCount]");

            return 1;
        }

        public boolean hasStableIds() {
            Log.v(TAG, "[hasStableIds]");

            return true;
        }

        private void fetchTimelines() {
            try {
                HttpClient httpClient = new DefaultHttpClient();
                HttpResponse response = httpClient.execute(
                    new HttpGet("https://api.twitter.com/1/statuses/user_timeline/kinjou_j.json?count=10")
                );

                if(response.getStatusLine().getStatusCode() != 200) {
                    return;
                }

                jsons = new JSONArray(EntityUtils.toString(response.getEntity()));
            } catch (ClientProtocolException e) {
                e.printStackTrace();
            } catch (IOException e) {
                e.printStackTrace();
            } catch(JSONException e) {
                e.printStackTrace();
            }
        }

        private Bitmap fetchProfileImage(String url) {
            if(profileImage == null) {
                Log.v(TAG, "[fetchProfileImage]: "  + url);

                try {
                    HttpClient httpClient = new DefaultHttpClient();
                    HttpResponse response = httpClient.execute(new HttpGet(url));

                    if(response.getStatusLine().getStatusCode() == 200) {
                        byte[] data = EntityUtils.toByteArray(response.getEntity());

                        profileImage = BitmapFactory.decodeByteArray(data, 0, data.length);
                    }
                } catch(IOException e) {
                    e.printStackTrace();
                }
            }

            return profileImage;
        }
    }
}
以上。で実際に動かしてみると
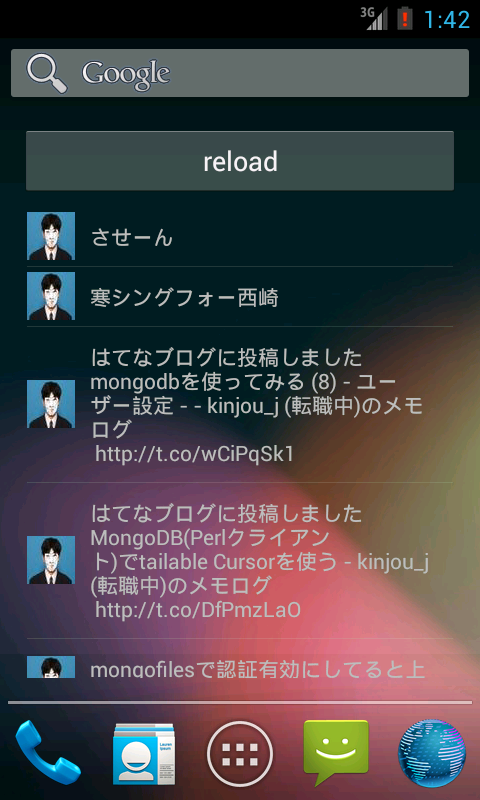
っつー感じでAppWidgetでListView使えるみたいな感じ
追記
AndoidAnnotations使われているけど、一応上記同様なソースは https://github.com/kinjouj/android_appwidget_listview_demo にて公開してます