Android AccountManagerで使えるカスタムアカウントを開発する方法
んまぁAndroid端末使ってる人とかだと見た事あるし、触った事もある人もいるだろう

まぁWebサービスとかのアカウントを端末内に保管して、認証要求だとかをAccountManagerな機能を通じて行えたり出来るAPIが存在する訳ですが、これの独自のを作る方法。まぁ結構書く量が多いので
認証方式
OAuthとか使って権限管理の元で色々出来たりするのが一番良いんですが、今回は適当にトークン取得リクエストしたらトークン返して、でAPIを実行する際にトークンをヘッダーにぶち込んでリクエストしたら結果が返ってくる的な感じ
まぁ良くあるかどうかは定かじゃないけど、RailsとかだとDeviseとかそういうのがあったりもする訳で。これもとりあえずおいといて
という事で本題な所のAndroidの方を実装する。もっかいいうけどクソ長いんでww
AndroidManifest.xml
<?xml version="1.0" ?>
<manifest
    xmlns:android="http://schemas.android.com/apk/res/android"
    package="net.kinjouj.test"
    android:versionCode="1"
    android:versionName="1.0">

    <uses-sdk android:minSdkVersion="5" android:maxSdkVersion="17" android:targetSdkVersion="17" />

    <uses-permission android:name="android.permission.AUTHENTICATE_ACCOUNTS" />
    <uses-permission android:name="android.permission.GET_ACCOUNTS" />
    <uses-permission android:name="android.permission.USE_CREDENTIALS" />
    <uses-permission android:name="android.permission.INTERNET" />

    <application android:label="@string/app_name" android:icon="@drawable/icon">
        <!-- AccountManagerを使って認証してAPIを使ってデータを表示するだけのActivity -->
        <activity android:name=".MainActivity">
            <intent-filter>
                <action android:name="android.intent.action.MAIN" />
                <category android:name="android.intent.category.LAUNCHER" />
            </intent-filter>
        </activity>

        <!-- 認証要求の際のAcitvity -->
        <activity android:name=".AuthenticatorActivity" android:exported="false">
            <intent-filter>
                <action android:name="net.kinjouj.test.account.LOGIN" />
                <category android:name="android.intent.category.DEFAULT" />
            </intent-filter>
        </activity>

        <!-- アカウントのオプション設定のActivity(Preferences) -->
        <activity android:name=".AuthenticatorPreferenceActivity" />

        <!-- AccountAuthenticatorなサービス -->
        <service android:name=".AuthenticatorService" android:exported="true" android:process=":auth">
            <intent-filter>
                <action android:name="android.accounts.AccountAuthenticator" />
            </intent-filter>
            <meta-data android:name="android.accounts.AccountAuthenticator" android:resource="@xml/authenticator" />
        </service>
    </application>
</manifest>
な感じ。で必要な設定リソースから作る
res/values/strings.xml
<?xml version="1.0" ?>
<resources>
    <string name="app_name">Sample</string>

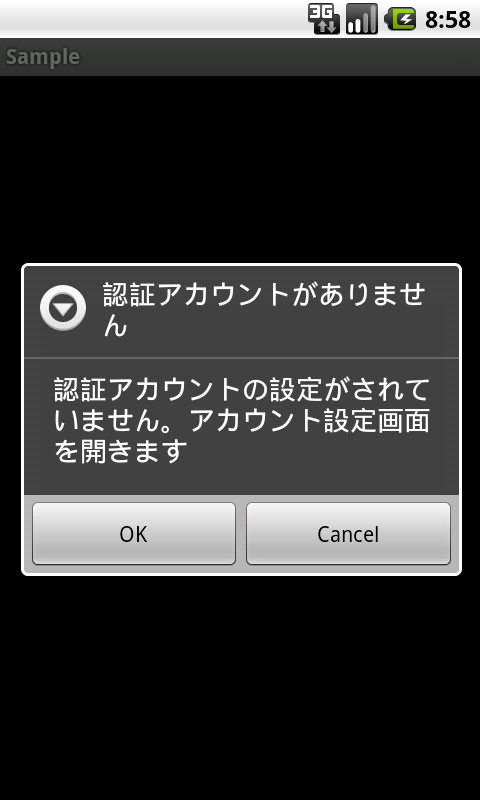
    <string name="account_missing_dialog_title">認証アカウントがありません</string>
    <string name="account_missing_dialog_summary">認証アカウントの設定がされていません。アカウント設定画面を開きます</string>

    <string name="account_type">net.kinjouj.test.account</string>
    <string name="account_label">サンプルアプリ認証アカウント</string>

    <string name="preference_category_extra_title">その他</string>
    <string name="preference_category_extra_nickname_title">ニックネーム</string>
    <string name="preference_category_extra_nickname_summary">ニックネームを設定</string>
</resources>
でAccountAuthenticatorを使う際に必要となる設定リソース(AndroidManifest.xmlだとres/xml/authenticator.xml)を作る
res/xml/authenticator.xml
<?xml version="1.0" ?>
<account-authenticator
    xmlns:android="http://schemas.android.com/apk/res/android"
    android:accountType="@string/account_type"
    android:icon="@drawable/icon"
    android:smallIcon="@drawable/icon"
    android:label="@string/account_label"
    android:accountPreferences="@xml/prefs" />
でアカウント設定でオプションで設定出来るPreferenceな設定ファイルも必要
res/xml/prefs.xml
<?xml version="1.0" ?>
<PreferenceScreen xmlns:android="http://schemas.android.com/apk/res/android">
    <PreferenceCategory android:title="設定" />
    <PreferenceScreen android:key="account_settings" android:title="Account Settings">
        <intent
            android:targetPackage="net.kinjouj.test"
            android:targetClass="net.kinjouj.test.AuthenticatorPreferenceActivity" />
    </PreferenceScreen>
</PreferenceScreen>
な感じ。設定画面はAuthenticatorPreferenceActivityにintentする方向で
んでPreferenceな所からちょっと作っておく
AuthenticatorPreferenceActivity.java
package net.kinjouj.test;

import android.preference.PreferenceActivity;
import android.preference.Preference;
import android.preference.Preference.OnPreferenceChangeListener;
import android.os.Bundle;

public class AuthenticatorPreferenceActivity extends PreferenceActivity {
    @Override
    public void onCreate(Bundle bundle) {
        super.onCreate(bundle);
        addPreferencesFromResource(R.xml.pref);

        findPreference("user_nickname").setOnPreferenceChangeListener(new OnPreferenceChangeListener() {
            public boolean onPreferenceChange(Preference preference, Object newValue) {
                // newValueで新しい設定値を取得出来る

                return true;
            }
        });
    }
}
でPreferenceで参照するリソースが必要
res/xml/pref.xml
prefs.xmlでは無いので注意
<?xml version="1.0" ?>
<PreferenceScreen xmlns:android="http://schemas.android.com/apk/res/android">
    <PreferenceCategory android:title="@string/preference_category_extra_title">
        <EditTextPreference
            android:key="user_nickname"
            android:title="@string/preference_category_extra_nickname_title"
            android:dialogTitle="@string/preference_category_extra_nickname_title"
            android:summary="@string/preference_category_extra_nickname_summary" />
    </PreferenceCategory>
</PreferenceScreen>
まぁニックネームを設定出来るようにするだけ
あとはアプリのActivity(MainActivity)とか認証要求を行うActivity(AuthenticatorActivity)とService(AuthenticatorService)とかをもろもろ作る
MainActivity.java
package net.kinjouj.test;

import org.apache.http.HttpResponse;
import org.apache.http.client.methods.HttpGet;
import org.apache.http.impl.client.DefaultHttpClient;
import org.apache.http.util.EntityUtils;
import org.json.JSONArray;
import org.json.JSONException;
import org.json.JSONObject;

import android.accounts.Account;
import android.accounts.AccountManager;
import android.accounts.AccountManagerCallback;
import android.accounts.AccountManagerFuture;
import android.app.Activity;
import android.app.AlertDialog;
import android.app.ProgressDialog;
import android.content.DialogInterface;
import android.content.Intent;
import android.os.Bundle;
import android.provider.Settings;
import android.widget.ArrayAdapter;
import android.widget.ListView;

public class MainActivity extends Activity {

    public static final String TAG = "AndroidAuthenticator";

    private ArrayAdapter<String> adapter;

    @Override
    public void onCreate(Bundle bundle) {
        super.onCreate(bundle);

        adapter = new ArrayAdapter<String>(this, android.R.layout.simple_list_item_1);

        ListView lv = new ListView(this);
        lv.setAdapter(adapter);

        setContentView(lv);
    }

    @Override
    public void onStart() {
        super.onStart();
        adapter.clear();

        final String type = getString(R.string.account_type); // net.kinjouj.test.account
        final AccountManager am = AccountManager.get(this);
        Account[] accounts = am.getAccountsByType(type);

        if(accounts.length > 0) {
            Account account = accounts[0];

            if(account == null) {
                return;
            }

            final ProgressDialog dialog = new ProgressDialog(this);
            dialog.show();

            // 設定したアカウントでgetAuthTokenしてトークンを取得
            am.getAuthToken(account, type, false, new AccountManagerCallback<Bundle>() {
                public void run(AccountManagerFuture<Bundle> result) {
                    String token = null;

                    try {
                        Bundle b = result.getResult();

                        try {
                            token = b.getString(AccountManager.KEY_AUTHTOKEN);

                            if(token == null) {
                                return;
                            }

                            try {
                                // 取得したトークンでAPIにヘッダーをつけてリクエスト
                                DefaultHttpClient httpClient = new DefaultHttpClient();
                                HttpGet request = new HttpGet("http://192.168.1.1:5000/api/data");
                                request.setHeader("X-Android-Security-Token", token);

                                HttpResponse res = httpClient.execute(request);

                                if(res.getStatusLine().getStatusCode() == 200) {
                                    // データをパースしてAdapterにぶちこむ

                                    String data = EntityUtils.toString(res.getEntity());

                                    if(data != null) {
                                        try {
                                            JSONArray jsons = new JSONArray(data);

                                            for(int i = 0;i < jsons.length();i++) {
                                                JSONObject json = jsons.getJSONObject(i);

                                                adapter.add(json.getString("name"));
                                            }
                                        } catch(JSONException e) {
                                            e.printStackTrace();
                                        }
                                    }
                                }
                            } catch(Exception e) {
                                e.printStackTrace();
                            }
                        } catch(Exception e) {
                            e.printStackTrace();
                        }
                    } catch(Exception e) {
                        e.printStackTrace();
                    } finally {
                        am.invalidateAuthToken(type, token);

                        try {
                            if(dialog.isShowing()) {
                                dialog.dismiss();
                            }
                        } catch(Exception e) {
                            e.printStackTrace();
                        }
                    }
                }
            },null);
        } else {
            // アカウントが無いので端末上でアカウント認証を行う要求を出す。ただAndroidのアカウント管理画面にintentするだけ

            AlertDialog.Builder builder = new AlertDialog.Builder(this);
            builder.setTitle(getString(R.string.account_missing_dialog_title));
            builder.setMessage(getString(R.string.account_missing_dialog_summary));
            builder.setPositiveButton("OK", new DialogInterface.OnClickListener() {
                public void onClick(DialogInterface dialog, int which) {
                    startActivity(new Intent(Settings.ACTION_ADD_ACCOUNT));
                }
            });
            builder.setNegativeButton("Cancel", new DialogInterface.OnClickListener() {
                public void onClick(DialogInterface dialog, int which) {
                    MainActivity.this.finish();
                }
            });
            builder.create().show();
        }
    }
}
アカウントがあれば、そのアカウントでgetAuthTokenしてそのトークンを使ってWeb APIにヘッダーをつけてリクエストしレスポンスをパースしてListViewにバインド
アカウントがなければAndroidのアカウント設定画面にintentしてアカウントを作るように要求
でアカウントを追加する際に今回の独自のアカウントを選択した場合にはAuthenticatorServiceが作用するのでそれを作る
AuthenticatorService.java
package net.kinjouj.test;

import android.accounts.AccountManager;
import android.app.Service;
import android.content.Intent;
import android.os.IBinder;

public class AuthenticatorService extends Service {

    @Override
    public IBinder onBind(Intent intent) {
        if(intent.getAction().equals(AccountManager.ACTION_AUTHENTICATOR_INTENT)) {
            return new SampleAccountAuthenticator(this).getIBinder();
        }

        return null;
    }
}
でonBindでAbstractAccountAuthenticatorを継承したクラスをnewしでgetIBinderを返す
SampleAccountAuthenticator.java
package net.kinjouj.test;

import java.util.ArrayList;
import java.util.List;

import org.apache.http.HttpResponse;
import org.apache.http.NameValuePair;
import org.apache.http.client.entity.UrlEncodedFormEntity;
import org.apache.http.client.methods.HttpPost;
import org.apache.http.impl.client.DefaultHttpClient;
import org.apache.http.message.BasicNameValuePair;
import org.apache.http.util.EntityUtils;

import android.accounts.AbstractAccountAuthenticator;
import android.accounts.Account;
import android.accounts.AccountAuthenticatorResponse;
import android.accounts.AccountManager;
import android.accounts.NetworkErrorException;
import android.content.Context;
import android.content.Intent;
import android.os.Bundle;
import android.util.Log;

import static net.kinjouj.test.MainActivity.TAG;

class SampleAccountAuthenticator extends AbstractAccountAuthenticator {

    private Context ctx;

    public SampleAccountAuthenticator(Context ctx) {
        super(ctx);

        this.ctx = ctx;
    }

    @Override
    public Bundle addAccount(AccountAuthenticatorResponse response, String accountType, String authTokenType, String[] requiredFeatures,Bundle options) throws NetworkErrorException {
        Intent intent = new Intent();
        intent.setAction(AuthenticatorActivity.ACTION);
        intent.putExtra(AccountManager.KEY_ACCOUNT_AUTHENTICATOR_RESPONSE, response);

        Bundle b = new Bundle();
        b.putParcelable(AccountManager.KEY_INTENT, intent);

        return b;
    }

    @Override
    public Bundle confirmCredentials(AccountAuthenticatorResponse response, Account account, Bundle options) throws NetworkErrorException {
        Log.v(TAG, "confirmCredentials");

        return null;
    }

    @Override
    public Bundle editProperties(AccountAuthenticatorResponse response, String accountType) {
        Log.v(TAG, "editProperties");

        return null;
    }

    @Override
    public Bundle getAuthToken(AccountAuthenticatorResponse response, Account account, String authTokenType, Bundle options) {
        Log.v(TAG, "getAuthToken");

        if(account == null) {
            return null;
        }

        /* ここでアカウント設定でオプショナルな設定項目(Preference)を取る事も出来る
        SharedPreferences prefs = PreferenceManager.getDefaultSharedPreferences(ctx);
        String nickname = prefs.getString("user_nickname", null);
        */

        AccountManager am = AccountManager.get(ctx);

        String username = account.name;
        String password = am.getPassword(account);

        if(username == null || password == null) {
            return null;
        }

        String token = null;

        try {
            List<NameValuePair> pairs = new ArrayList<NameValuePair>(2);
            pairs.add(new BasicNameValuePair("username", username));
            pairs.add(new BasicNameValuePair("password", password));

            DefaultHttpClient httpClient = new DefaultHttpClient();
            HttpPost request = new HttpPost("http://192.168.1.1:5000/user_token");
            request.setEntity(new UrlEncodedFormEntity(pairs));

            HttpResponse res = httpClient.execute(request);

            if(res.getStatusLine().getStatusCode() == 200) {
                token = EntityUtils.toString(res.getEntity());
            }
        } catch(Exception e) {
            e.printStackTrace();
        }

        Bundle b = new Bundle();

        // トークンを取得できた場合にはBundleに格納する

        if (token != null) {
            b.putString(AccountManager.KEY_ACCOUNT_NAME, account.name);
            b.putString(AccountManager.KEY_ACCOUNT_TYPE, account.type);
            b.putString(AccountManager.KEY_AUTHTOKEN, token);
        }

        return b;
    }

    @Override
    public String getAuthTokenLabel(String authTokenType) {
        Log.v(TAG,"getAuthTokenLabel");

        return null;
    }

    @Override
    public Bundle hasFeatures(AccountAuthenticatorResponse response, Account account, String[] features) throws NetworkErrorException {
        Log.v(TAG,"hasFeatures");

        return null;
    }

    @Override
    public Bundle updateCredentials(AccountAuthenticatorResponse response, Account account, String authTokenType, Bundle options) throws NetworkErrorException {
        Log.v(TAG,"updateCredentials");

        return null;
    }
}
AccountManager.getAuthTokenをするとコールバックでAccountManagerFuture
でアカウント追加から来た時にはaddAccountが呼び出されて、そこからAuthenticatorActivity.ACTION(AuthenticatorActivityを発生させるアクションintent)が投げられて、登録に伴う認証開始が行われるという感じ
でそのAuthenticatorActivityを作る
AuthenticatorActivity.java
package net.kinjouj.test;

import java.math.BigInteger;
import java.security.MessageDigest;
import java.security.NoSuchAlgorithmException;

import android.app.Activity;
import android.accounts.Account;
import android.accounts.AccountAuthenticatorResponse;
import android.accounts.AccountManager;
import android.content.Intent;
import android.os.Bundle;

public class AuthenticatorActivity extends Activity {

    public static final String ACTION = "net.kinjouj.test.account.LOGIN";

    @Override
    public void onCreate(Bundle bundle) {
        super.onCreate(bundle);

        Intent intent = getIntent();

        if(intent != null && ACTION.equals(intent.getAction())) {
            bundle = intent.getExtras();

            String password = toSHA1("test".getBytes());

            if(password != null) {
                // ここで認証出来るかチェックするのが良いかと。そうしないと認証できないアカウントをaddAccountされる

                AccountManager am = AccountManager.get(this);
                Account account = new Account("test", getString(R.string.account_type));
                boolean accountCreateSuccessful = am.addAccountExplicitly(account, password, null);

                if(accountCreateSuccessful) {
                    AccountAuthenticatorResponse response = bundle.getParcelable(AccountManager.KEY_ACCOUNT_AUTHENTICATOR_RESPONSE);
                    response.onResult(null);
                }
            }
        }

        finish();
    }

    private String toSHA1(byte[] data) {
        byte[] digest = null;

        try {
            digest = MessageDigest.getInstance("SHA1").digest(data);
        } catch(NoSuchAlgorithmException e) {
            e.printStackTrace();
        }

        if(digest != null) {
            return new BigInteger(1, digest).toString(16).toLowerCase();
        }

        return null;
    }
}
AccountManager.addAccountExplicitlyでアカウントを登録できる模様。という感じで作れる
で流れをまとめると
- MainActivityが起動する。この時点でアカウントが無いので、アカウント設定画面にintentを送出される
- アカウント設定画面が開き、今回定義したアカウントを選択するとAuthenticatorServiceが呼ばれる
- AuthenticatorServiceからAbstractAccountAuthenticator(SampleAccountAuthenticator)に処理が流れる
- AbstractAccountAuthenticator.addAccountからアカウント設定に伴う要求処理でAuthenticatorActivityが起動される
- AuthenticatorActivityからAccountManager.addAccountExplicitlyを使ってアカウントを登録する。この際フォームなどを使ってユーザーIDやパスワード等を利用して認証させるっていうのが本式かも(今回はやってない)
- アカウント登録が終わったらAccountManager.getAuthTokenを使ってトークンを取得、その後Web APIへリクエストしてレスポンスのデータをListViewへバインド
大体はこういう流れかと。で実際に動作させてみると

まずアカウント無いので登録を促される。でそのままOKするとアカウント登録画面に行くので

今回作ったアカウント方式を選択する。この際にAuthenticatorActivityでフォームとか出してるのならそれをごにょごにょしてやって終わると

という風にアカウントを使って取得したトークンを使ってWeb APIからデータを取得してバインド
まぁこんな感じ。すっごいややこしいですけど
ちなみに、 http://www.c99.org/2010/01/23/writing-an-android-sync-provider-part-1/ というLast.fmのサービスのアカウントをAndroidで使うデモ・方式、そしてソースも公開されてたはずなのでそれも参考にすると良いかも